
Weekend Fun: Teddy Bears’ Picnic!
Long ago, in 1907, there was a melody written by American composer John Walter Bratton. Not quite as long ago, in 1932, Irish songwriter Jimmy Kennedy wrote lyrics for that melody. The result was The Teddy Bears’ Picnic, a fanciful song/story about what your teddy bears might do when you’re not around.
The teddy bear was named after a president of the United States, Teddy Roosevelt. In 1902, Roosevelt went on a bear hunting trip in Mississippi but didn’t find a bear. Someone tied a bear to a tree for the president, but Teddy Roosevelt, who was known for being a big game hunter, did the honorable thing and refused to shoot that poor, trapped bear. The story was told around the country, and a man who had a candy store in Brooklyn heard it. He had a stuffed bear made in Roosevelt’s honor, calling it “Teddy’s Bear.” That was the very first teddy bear!
Bears have been an important childhood toy ever since, and there are many books that feature bears as the main character. One of the most famous is Winnie the Pooh by A. A. Milne, but Paddington Bear by Michael Bond is almost as famous. And the classic picture book Corduroy by Don Freeman features a bear that thought he would never find a home.
You can find recordings of The Teddy Bears’ Picnic on YouTube and there are picture book versions available as well.
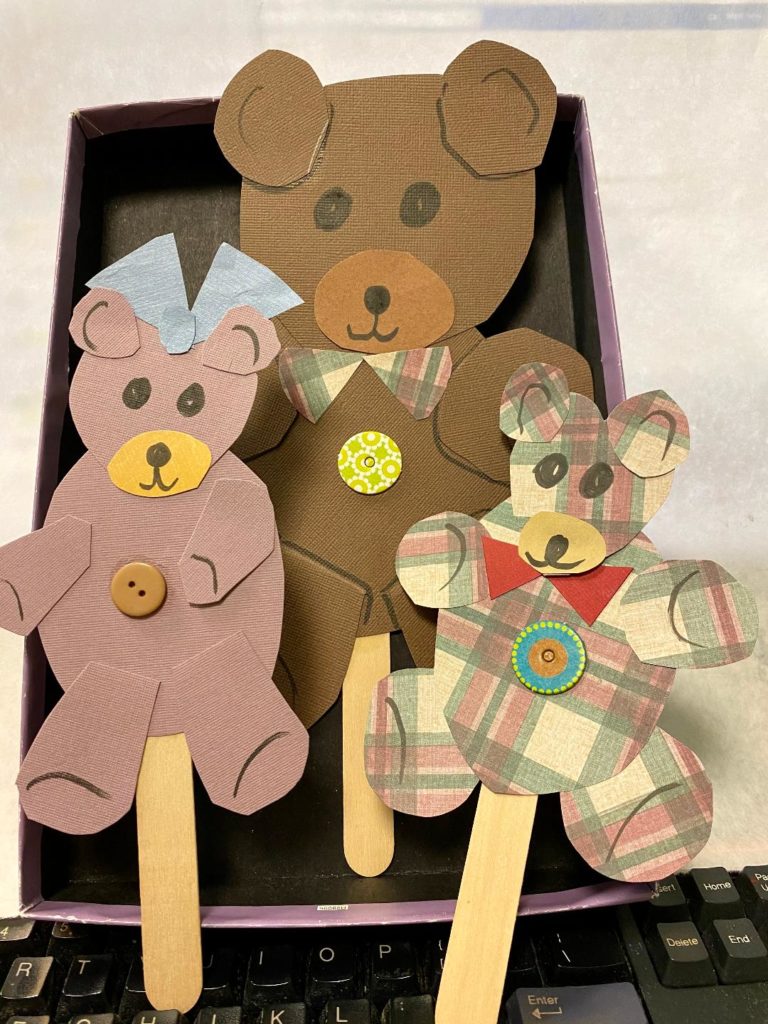
Extend the story by making Teddy Bear Stick Puppets! Make them in different sizes and with different shapes (circles, ovals, hearts, etc). You can even make clothes for them and then have your own Teddy Bears’ Picnic!
How to Make a Teddy Bear Stick Puppet
What you need:
- Large sheet of paper, any color, or several smaller sheets
- Scissors
- Glue stick
- Black marker
- Assorted scrap papers
- Button
What you do:
- Cut a circle slightly larger than your hand from the large sheet of paper. This is the bear’s body.
- Cut a circle slightly smaller than your hand for the bear’s head.
- Cut four smaller circles for the bear’s arms and legs.
- Cut two even smaller circles for the bear’s ears. TIP: It’s more artistic if the circles are a little uneven, but you can trace circles or use different shapes if you prefer.
- Glue the head onto the body and then glue the arms, legs, and ears at the sides and the top.
- Cut a small oval shape from the scrap paper for the bear’s mouth and nose and glue it near the bottom of the head.
- Use a black marker to draw the bear’s face. Add half circle lines on the ears, arms, and legs.
- Cut two small triangles and clue with the tips together under the mouth for a bow tie. Optional: Glue the bow on top of the bear’s head for a girl bear.
- Glue a button on the bear’s tummy. TIP: If you don’t have a button, cut a circle from scrap paper or cardboard.
- Glue a craft stick or straw on the back of the bear for a handle.

