
Weekend Fun: The Robins of Spring
They say that a robin is the first sign of spring. Have you seen one in your yard yet?
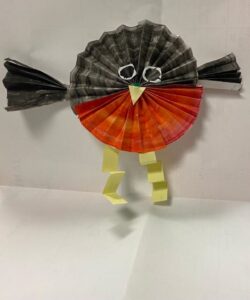
Make your own robin – or a whole robin family! – while you wait, and check out This is the Nest that Robin Built by Denise Fleming, or learn more about robins and other birds by checking the books in 598.8.
What you need:
• 1 ½ sheets of computer paper per robin
• Yellow paper (or computer paper colored yellow)
• Crayons, markers, gel crayons, or watercolor paints
• Glue stick
• String or pipe cleaner (a.k.a. “chenille stem”)
• Scissors
What you do:
- Fold the computer paper in half and cut it so that you have two equal pieces.
- Color two of them in shades of black and/or gray.
- Color the other one in shades of red and/or orange.
TIP: Using more than one color on the same paper, e.g. red and orange, gives dimension and is closer to the actual color in nature.
- Be sure both pieces of paper are dry (if you used watercolors or gel crayons) before moving on to the next step.
- Accordion fold the red/orange and one of the black/gray papers – make the creases sharp! Each fold should be approx. ½ inch wide.
- Apply glue to one folded edge of the red/orange paper and to one folded edge of one of the black/gray pieces and stick them together. You now have one piece that is half red/orange and half black/gray.
- With the papers still folded tightly together, fold it in half to find the center.
- Tie a string or wrap one end of a pipe cleaner around the center. Tie it tightly! The piece sort of looks like a butterfly. Place it on your workspace so that the red/orange part is on the bottom.
- Apply glue along the edge of the black/gray folds and stick them together. Press firmly to get a good “stick.” Repeat for the red/orange folds.
- Cut a triangle for the beak out of the yellow paper. TIP: If you don’t’ have yellow paper, color a piece of white paper yellow.
- Glue the beak at the center so it covers the pipe cleaner or string.
- Cut two circle or oval shapes from white paper and draw the eyes with black marker or crayon. TIP: In a robin’s eyes, the black takes up most of the white space – but you can make yours however you like.
- Glue the eyes above the beak.
- Take the second piece of black/gray paper and cut it in half.
- Accordion fold each of these pieces.
- Take one of the pieces and pinch the bottom ends together so it looks like a fan.
- Glue it between two of the folds behind the robin. TIP: It looks best if it’s placed behind the black/gray half. Repeat with the other piece so that you have two wings, one on each side of the bird.
Your robin is ready to act out stories or decorate your room! Make several robins and they can tell jokes and put on a play.
Some robin jokes for you:
Robin 1: Knock, knock!
Robin 2: Who’s there?
Robin 1: Robin.
Robin 2: Robin who?
Robin 1: Robin the cookie jar again?
Robin 2: No, not the cookie jar – robins like worms!
Why was the robin on the trampoline?
Because it was the first sign of spring!
Why did the robin go to the hospital?
Because it needed “tweetment.”
